Wednesday, 14 October 2015

... planting garlic

Greetings everybody,

It is that time of year again. Autumn. And that means it is time to plant garlic.

We only plant Hardneck garlic and the variety we plant is called "Music". Hardneck garlic has a good keeping quality and it has the bonus of getting those wonderful garlic scapes which we love as they are so delicious.

Here is my method for planting garlic. It is really very simple.

You need to start with a bed that is completely free of weeds. Garlic absolutely hates to grow with any weed competition so this is a very important step. We are planting into brand new raised beds but I still filled them and let them sit for a while so I could clean off any weeds that did germinate. Rake the bed nice and smooth.


I plant my garlic in rows which are 10" apart. I find that this allows me to get in there with a hoe to get at whatever weeds appear. I simply mark those rows down the length of the bed making sure the spacing remains correct. I use a piece of an old shovel handle that had broken off to quickly push through the soil to make the shallow furrow but of course you can use whatever you have handy.


Next is to separate all the cloves from the heads. I purchase certified garlic from a grower that I trust. In my case that happens to be Vesey's from P.E.I. 
I have never been disappointed with my purchases from them and they absolutely stand behind their products.


I plant the cloves 6" apart and simply use an old yardstick to measure and keep them the correct distance. 


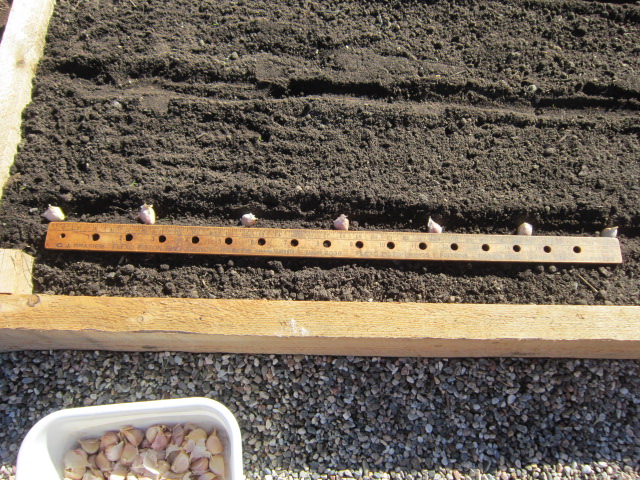
Once they are all sitting in the correct spots, I simply poke them down into the soil. They should be approximately 2" down. Do not plant them too deeply.


After they are all planted and the surface soil is smoothed again I cover the entire bed with straw for winter protection. The soil in your beds should not be left uncovered to be exposed to the elements over the winter. You can choose any number of things to cover them but I often use straw.


So there you have it. Your garlic is all tucked away in the garden ready to burst into growth in the spring. I planted 3 pounds of garlic which translated into 210 individual cloves. With the correct spacing, that required 2 1/3 of my raised beds. Although the garlic will stay in these beds for a large part of the growing season I will still be able to get a quick crop in there after they are harvested.

That is all from me for today. Thanks so much for stopping by. Enjoy your day. Cheers.

Tuesday, 13 October 2015

... autumn broccoli

Hello there everybody,

After all the excitement of the weekend I spent a good part of the day yesterday in the garden.

A while ago I had cleaned out the bed that had previously grown such a wonderful crop of beans and replanted it with some autumn broccoli, kohlrabi and some lettuce.

We have been eating the lettuce and the kohlrabi and I decided it was time to get in whatever broccoli had managed to grow. We have had a couple nights with a hard frost and although the broccoli is somewhat cold tolerant there was no point in leaving it there.

A couple of the plants only managed to produce a small head but a few of them did grow out a really decent size head of broccoli. 


I have cut them all and after sorting them, we will get three nice meals from this lovely little pile I have here.


When you are gardening in a climate such as ours where it is not a very long growing season you need to take advantage of succession planting. We only had in about 10 plants but at least they managed to produce a small crop. Of course next year will be different as the beds are already constructed so the plants will go in earlier and that will make a big difference.

Thanks for stopping by. Next discussion will be on planting garlic. Cheers.

Monday, 12 October 2015

... the dangers of the country

Good morning,

Today is Thanksgiving Day here in Canada. Frank and I have a lot to be thankful for. 

We celebrated and had a wonderful dinner with family and friends yesterday at Frank's sisters house. They live about a 1 1/2 hour drive from us. 

I was driving home. The roads are all very dark and some of them are quite twisty. As I do not really care for driving dark twisty roads I was driving a bit below the speed limit.

It all happened in less than a second. 

A large deer ran right into the drivers side corner/side panel of the car.

I saw it for a fleeting second, barely felt anything and then it was gone.

Frank was on his cell phone trying to get the score of the Blue Jays baseball game. He saw and felt nothing.

I said "a deer just ran into us". 

That made him look up. We had both our dogs in the car and they had not reacted either.

I pulled over to the side of the road and we could see that there was a great deal of damage and the car was leaking fluid.

We called the police and a tow truck. The driver of the truck walked up the road with a flashlight to find the deer. He said is was a massive big doe. He said he had no doubt that she would have died almost instantly. I am thankful for that as I find it very troubling to know that it is dead. Not because of me as she ran into the car. Nevertheless, it is still troubling.

The truck driver looked at the damage and said that if she had run into the road one second sooner I would have hit her full on and she would likely have come through the windscreen and we both could easily have been killed.

Our guardian angels were definitely sitting on our shoulders last night as we walked away without a scratch.

It is hard to believe that there could be this much damage and we did not even feel it. We had been told when we bought our car, a Honda Civic Hybrid, that they are excellent in front end crashes. All that they said was true


I think I am still somewhat shell shocked by the whole incident. I told Frank when our good friend and neighbour got out of his bed and drove 45 minutes to come and get us and when we can walk away from this sort of thing completely unharmed that we do indeed have a great deal to be thankful for.

Thanks for visiting. I think I will go out and do some work in the garden to clear my head. Have a great day.

Friday, 9 October 2015

... purging some of my stash of books

Hello everybody,

In addition to all the other activities that have been going on around here I have also had a chance to go through my large collection of what I call "homesteading" books. 

I am selling off quite a few of them either because I have read them and will not read them over again or in a couple of cases because I have duplicate copies for some reason.

All of the books are in excellent condition and I have a very low price on all of them. I will take a photo of each of them and post that shortly. If any of you are interested, please leave a comment so I can get in touch with you.

Please note that all of these books are written in English (for all you wonderful people from countries where English is not your native tongue).

We finally finished painting the house yesterday and we are both exhausted today after 10 days of priming and painting. Today is a day off from everything as we both really do need the rest.

Thanks for visiting. Cheers.


Thursday, 8 October 2015

... how to can tomato sauce

Greetings everyone,

I know that I have been MIA for a while and I do apologize for that. This is a very busy time of year for us. We have been gathering the harvest from the garden for storage. Fantastic crop of squash this year and lots of tomatoes. The everbearing strawberries are still producing quite a few berries although we had a hard frost last night so I expect that will be the end of them.
In addition to all of that we are painting the outside of our house. Huge job.

One of the things that we have been doing is making tomato sauce. I have done a blog post on that before but I did not talk about safely canning the sauce. 

At present I use a hot water bath canner, the same one that I have used for the last 20+ years without any problems.

Here is my step by step process of canning tomatoes.

Naturally, first of all you need to make the tomato sauce. I will leave that up to you to use whatever recipe and method you choose. I wash the tomatoes, cut them up, run them through our grinding machine to separate seeds and skin from flesh and juice and then cook them down for a few hours.

When we are ready to can them we fill up the canner with hot water and set it up outside on a propane heater and bring the water to a boil.

The next step is to collect the jars and rings and give them a really good wash in hot soapy water. Rinse well.


I them put the wet jars on a cookie sheet and into a COLD oven. I heat the oven to 225 F and when it has reached temperature I set the timer for 15 minutes.


Meanwhile I put the rings and lids into a pot and bring to a rapid simmer after which I turn off the heat and let them sit until needed. I have heard that there are new lids out there that do not require warming up but I have yet to find them in my stores.


The tomato sauce is brought to a boil. Sorry the picture is so misty but there was a lot of steam coming off the pot.  :)


We get all our materials ready. The canning funnel and the ladle are sterilized under boiling water and we get out a bottle of lemon juice.


We do not know the exact acidity level of the tomatoes so we do not take a chance when canning them. We simply add 2 tablespoons of lemon juice to each jar of sauce. We have never had a problem doing this. Better safe than sorry.

After filling the jars, (and be sure to leave the correct head space indicated by your recipe),  wiping the rims and putting on the lids and rings, they go into the rack and get lowered into the canner. The jars must be at least 1" below the water level. We put on the lid and wait for it to return to a full boil at which point I set the timer for 45 minutes which is the time indicated in my canning book. 

I am sorry that I do not have photos of filling up the jars but we cannot waste time when doing that. The jars are scalding hot as is the sauce and it needs to be done quickly.

When the time is up we remove them carefully and set them on a towel in a draft free place to allow them to cool completely. I just love to hear the sound of all the lids pinging as they seal up. Music to my ears!


After they are all cool I wipe down the jars, either label them or write the date on the lid and store them away in the larder for later use. I just love knowing that I have that wonderful store of food available for our winter suppers.

That is all from me for today. If you are Canadian I hope you have a wonderful Thanksgiving as this is the weekend that we celebrate here in Canada.

Thanks so much for stopping by. See you back soon. Cheers.


Friday, 18 September 2015

...tomato sauce .. but wait! It's GREEN!

Hi there everybody,

I noted in a previous post that a couple of the tomato varieties we are growing this year are green ones, namely Green Zebra and Green Sausage.

Because the Green Sausage is a paste variety we decided to try to make some tomato sauce from them with a few of the Green Zebra thrown in. 

They all get washed then cut into quarters and then we put them through our trusty, hand crank tomato press. 


I am sure it has a proper name but I do not know what it is. We bought it about 20 years ago and it still works a treat. It separates the skin and seeds from all the flesh and juice.


I sauteed up an onion with a couple cloves of garlic in some olive oil and added the tomato pulp and cooked it down for a couple of hours. It looks a lovely shade of green and I am sure it will make a fantastic pasta sauce with that wonderful unusual colour!


In this case because there was not all that much sauce I simply put it into containers and froze it. Normally when we make a large batch I process it in mason jars in a hot water bath.

We are in the process of making sauce from all the red paste tomatoes we have collected but that is for another day.

The weekend is upon us so. I hope everybody has a great weekend and thanks so much for stopping by to visit with me. Cheers.


Thursday, 17 September 2015

... when life gives you zucchini...

Greetings everybody,

Anyone who has ever grown zucchini or courgettes knows that they are prolific little beggars. That is probably an understatement. 

For some reason that I simply cannot fathom, I actually planted 9 plants this year. I had started the seed in pots and then just separated them and planted out everything that had germinated. Absolute madness, I tell you!

So, as was to be expected, we have been overrun with zucchini. We have been giving them away to anyone who is willing to take them. We try to keep up with the production, honest, we really do!

But every once in a while I find it, just lying there, hiding under the leaves. A whopper as big as my arm. And sometimes even bigger.

Now if you have read my blog for a while you know how I feel about wasting food. Even the unending zucchini.

Thankfully there is something that can be done with these bigguns.


I make zucchini bread.

I grate up all the big zukes I have on hand and then measure it all out. 

If I am going to turn on my oven, I like to get maximum use from it so I bake as many at the same time as I can. 

My recipe makes one loaf and calls for one cup of grated zucchini. So yesterday when I made the bread, I had enough for 5 loaves which just so happens to be the number of bread pans that I have.  :)

Here is my recipe for those of you who find yourselves besieged with zukes. I have tried quite a few different recipes and finally adapted one to suit my purposes. I often find that they have more oil than I would like to use and then they are greasy afterwards. This recipe uses less but it is still moist and delicious.

Zucchini Bread

1 beaten egg
1 cup of grated washed and unpeeled zucchini or summer squash
1/4 cup of oil (I use canola)

1 1/2 cups of unbleached all-purpose flour
1 cup of sugar
1 teaspoon of cinnamon
1/2 teaspoon of baking soda
1/4 teaspoon of baking powder
1/4 teaspoon of salt
1/4 teaspoon of freshly grated nutmeg
A good handful of chopped walnuts or pecans, about 1/2 a cup of so. You can 
   leave out the nuts if you have allergies or just prefer not to use them

Grease a 8x4 loaf pan. I use one of those baking sprays but use whatever you would normally use.

Mix together well the beaten egg, the zucchini and the oil.

In a separate bowl stir together all the dry ingredients except the nuts.

Add the moist ingredients to the dry all at once and stir until just moistened. Remember the laws of quick breads - DO NOT OVER MIX.

Stir in the nuts briefly just to combine.

Pour into the loaf pan and smooth the top.


Bake at 350F degrees until done, which is about an hour. That means that a cake tester stuck in the middle comes out clean. Times can vary so I start to check just before the hour. I find that it also seems to change the time depending on the number of loaves that are in there. When I baked the 5 loaves it took one hour and five minutes. They should be lovely and golden when they come out.

Cool on a wire rack for about 10 minutes and then remove from the pan and leave on the rack until completely cool. 


I put one of them into a tin to eat right away and the remaining ones I wrap in aluminium foil, label them, and into the freezer they go. In the dark bleak days of February, they will be a delicious reminder of hot summer days and my mental breakdown for planting so many!  :)

Enjoy!

Thanks for visiting with me today. See you back here soon. Cheers.